Less is Mora - The Complete Tiny House Adventure
- Rachael Mora
- Mar 17, 2017
- 9 min read

I didn’t even realize that if you aren’t my friend on facebook, you actually may not know all that much about my life :p. Specifically – our tiny house! I did blog about it throughout the process a bit (before I got so overwhelmed building that I had zero time for documentation and an occasional Instagram photo was our best shot), but haven’t ever compiled it all together in one place to tell “our story”. So for posterity’s sake, here goes.


We decided to build a tiny house for primarily financial reasons. We had an apartment that we loved, but such a huge portion of our income was going towards rent and just “living” expenses per month. We weren’t 100% sure whether we wanted to stay in Louisville long term and didn’t feel ready to buy a house, but budgeting after rent and bills made it difficult to save a significant amount of money for things we wanted to do. I also have an interior design undergrad degree and designing a home is right up my alley of dreams – however, with a “regular sized” home there’s a lot less money to go around for designing a dream place. I loved the idea of building something small and designing it exactly the way I wanted, being able to splurge where I felt was worth it and save in areas I didn’t care about.
I’ll break this down into “Steps” for you guys and provide a brief overview of each. I know people have a TON of questions about this process and want to touch on as much as possible in this post – however feel free to comment or email with questions if you have them!
Step 1 – Finding Land
This is (in my opinion) the hardest step. Land isn’t necessarily cheap, and there are a lot of regulations limiting what you can do if there isn’t already a house on a piece of property. If you want to “park” a tiny house on an empty lot, you can’t do that. However, if you want to “park” a tiny house in someone’s backyard, that’s considered more of an “RV” and not a big deal. It’s messy and confusing and there’s not a ton of legislation on it. We looked for about a year for a lot before deciding to build in my Mom’s backyard.
Step 2 - Planning the Design
Many post it notes and pieces of scrap paper were consumed in the designing of this house. Seriously. I started out sketching potential floor plans and designs out on post it notes, then graduated to notebooks, then a sketch book, then watched some youtube videos on google sketch up, then built a rough design in google sketch up. Then my magic Dad took those rough sketches and we somehow built a house from it. More to come on that.
Step 3 – Building the House
My Dad has some construction experience in life and has built a few houses (apparently part of my random “Let’s find a project!” personality comes from him). I’m a super organized planner though, and he’s more of a “Let’s figure it out guy”. That got interesting but I learned a ton about just diving in and figuring things out instead of crazily prepping and planning obsessively so that’s good :p.
However – my planner personality can’t get through this post without listing out the sections of building our house with a brief overview of each. In no particular order:
Land Prep – Basically putting down some plastic and building a frame of I joists to place the house on. The house is basically just a big box on top of a platform that can be put on a trailer if/when it needs to get moved.

Walls – We are weird and built walls before floors. Instead of a traditional “framing” structure on top of a floor/foundation, we built a bunch of separate wall panels that were 2” thick, used recycled insulation, then cut out window/door holes according to the plan and eventually connected them all with 2” x 4”s on the tops and bottoms and attached them to the floor via a literally barn raising type thing :p.


Floors – We built similar panels for the floor – thicker, with regular insulation. We ran the plumbing pipes through the floor panels/insulation BEFORE putting them together (something I never would have thought of – where expert Dad comes into play).


Second Floor – Built another floor panel for floor two, then built walls for the second floor (what we at the time called the “Hat” until I began to hate that term). The walls on the second floor are cool – they are in two sections that are held together using joining boards which are removable should we need to move the house. We wanted enough space to stand in our loft, so we added in extra 2’ panels around the top of the walls that can be removed for moving and put back when we get to our destination. Keep in mind – this house was not built to be easily movable. It was built with the idea that we’d find a home for it someday in the future and move it exactly once :p.


Roof – Alex (my brother) and Dad get total kudos on this one, they knocked it out while Felipe and I were at work. Built trusses, added metal roofing, and probably a few other important steps that I missed because I wasn’t on site. Basically, they are awesome and it goes without saying that we wouldn’t have been able to do this without their help <3.

Plumbing – Plumbing is easier than I thought – you basically just connect pipes and use glue and make the water go all the places it should Playing with K’nex as a child will help your plumbing (and construction in general) skill immensely.

Electric – More connecting things to other things and making the electricity flow. Felipe took a more active part than I did in this (along with Dad obviously) and he is now our resident electrical smartie pants.
Lighting – Once the electric was done, we added the fan, track lights, and bathroom/kitchen/hall lights. You basically just rough-wire a light kit in then put in your pretty fixtures when you get them. Upstairs we actually don’t have a wired light (due to the removable nature of the loft walls) so our light fixture there just plugs into the wall and that plug is controlled by the light switch!)


Stairs – These were fun. I designed a tiny space for a staircase and Dad was like “Well for a standard staircase you’d need more space than that”. Never one to shy away from an impossible task, he came up with this brainchild and I added some rope lights and contrasting colors and you have this beauty. What could have been a hack job and I would have wished didn’t even have to be included ended up being a great feature in the home – We found that happening a lot! When you’re forced to work with challenges you have to find ways to make them not only work, but try to have them be an additional feature for the home. There’s no room for an ugly staircase when it’s visible from every room in your house :p.


Paint – We had a paint party. We drank Corona. It was a good day. (We also painted everything - EVERYTHING – in the house white with a few accent windows that had stain. It feels so bright and open and I love it! The white color with the accented beams and gabled ceilings really draws the eye upward and makes the place feel super spacious.


Raised Floor – I saw a bed in a floor on pitnerest and decided we had to have it. We really like to entertain and host friends/family for sleepovers and parties. Having a crash pad was important to us, so we built a raised floor leading into the kitchen and added a full sized mattress that slides out from under it! The other side is used for our broom, Swiffer, and various other long cleaning supplies.
Kitchen - The kitchen was SUCH an adventure. Once pet peeve of mine – refrigerators that poke out 6” further than EVERYTHING ELSE. I hate it in every house. So, we decided on a baby refrigerator that was super inexpensive and smaller like only 2” further out than standard counter depth. A regular sized fridge felt like it might overwhelm a tiny kitchen and we personally don’t’ store a ton at a time – most of our food is fresh and will either get eaten or expire, so we have pretty regular turnover on our fridge storage. One key thing I wanted to avoid was stuff that always stays on a counter – Instead of leaving appliances on the counter, I really wanted a space to put everything away (even if we used it every day). I can’t stand “organized clutter” and wanted to eliminate as much of that as possible. My happy place is when our counters have basically nothing on them :D.
I did some pricing on IKEA kitchens – my dreams were to have amazing pull out drawers. I quickly realized that even in a tiny house, that was going to be way out of our price range. So I started pricing out regular cabinets/cheapest options. Still felt like way more than I wanted to spend – we’re talking like ¼ of the entire house budget. So I got a little creative and we bought three Ikea Malm dressers ($79 each) and built a little stand out of 2” x 4”s, then added countertops, farmhouse sink, some drawer pulls, and some baseboard… and it is amazing. We also included a 6’ x 3’ fully openable bar window because again, pinterest, and it is perfect for entertaining in the warmer months. We have indoor/outdoor parties and it’s such a blast!
One other kitchen feature that has me like <3<3<3 is the corner window. It was difficult for my dad to figure out how to do affordable, as you’re basically joining two panes of glass without a frame on part of it, but as you can see the result is incredible and really opens up the corner. P.S. We have open shelving instead of cabinets and that saved a ton of money and helped to open up the kitchen as well.
Bathroom – I absolutely love our bathroom. Our sink is small but adorable, and our shower is my favorite – we have double showerheads – one overhead waterfall and one showerhead with a movable wand – and we tiled the shower with large 24” x 24” tiles. Apparently large tiles have the effect of making a space feel bigger, which I can certainly attest to. We actually got a short water heater and put it behind the shower wall/under the stairs – this space was going to be completely wasted, and now if holds our water heater AND our shower gets hot super fast because the water barely has to travel at all. Win-win! We have some shelves for storage – but again, we try not to overload them with a bunch of stuff because even with a lot of shelves clutter is your enemy.
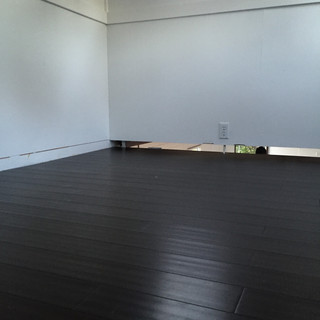
Flooring – With a tiny space we splurged on flooring a little – hard wood bamboo floors! I absolutely love the dark color and though it does get dirty faster, it literally takes less than 10 minutes to fully sweep and Swiffer the house, so it’s not an issue for us. Putting down the flooring was much easier than I expected - We sent the boys out to work on a deck (which they built crookedly but that's another story :p) while my sister and I laid the flooring!


Key Design Points:
With everything, we really wanted to make sure to keep things open and airy. We cut down on a lot of clutter and possessions in order to achieve this – we decided on a raised couch with legs over a storage couch as the bulky bottom would close off the room – having visibility under the couch doesn’t separate the space and makes it feel bigger. The raised floor in the kitchen provided a room separation, but not enough to make it feel like two completely separate rooms/closed off. The gabled ceilings and beams (as well as white walls) are meant to draw the eye upward and open up the space. There are so many tiny features we put thought into and worked on to make the house custom and awesome for us – for example rope lights in the stairs and around the living room and kitchen for some “ambiance” lighting, Felipe’s rope lights for background lights around the tv (his favorite thing :p), and so much else. Sometimes I sit back and am just amazed that we designed and built our little home. It really is one of the best decisions we’ve made in so many ways.
Financially – It’s awesome. We’ve been able to save so much money for our retirement, some pretty amazing vacations, and land/down payment on a future house when kids are in the picture.
Home-ownership wise – I think very few people actually get to design and live in their dream house, and we’ve already done that. Obviously there would be "nice to have" things, but we truly feel like we have everything we need and our home/lifestyle keeps us focused on what really matters to us (spoiler – each other, our peeps, and our dogs).
It was a lot of work and some sacrifices, but we love our little home and our lives so much. If you’re thinking about it – I highly recommend. Shoot me an email and I’d love to talk about what we regret/would have done differently (thicker walls for starters). Good luck and hope you enjoyed reading about our crazy adventure! If you made it to the end of this post you’re officially invited over for a drink :p.
Lastly - Check out all my photos here! There are way too many to include in a single post, but I made a google photos album. I can't promise we don't all look exhausted and gross in most of them, but it really is amazing to see it come together from start to finish.
See album here!


Comments